Django OAuth2 provider
Build a Python Identity and Access Management (IAM) using Django, OAuth Toolkit, REST Framework and OAuthLib.
What we will build?
The plan is to build an IAM from ground up starting simple and adding features along the way.
On this first part we will:
- Create the Django project.
- Install and configure Django OAuth Toolkit.
- Create two OAuth2 applications.
- Use Authorization code grant flow.
- Use Client Credential grant flow.
What is an IAM?
Is the discipline that enables the right individuals to access the right resources at the right times for the right reasons. – Gartner Glossary
What is OAuth?
OAuth is an open standard for access delegation, commonly used as a way for Internet users to grant websites or applications access to their information on other websites but without giving them the passwords. – Whitson Gordon
Django
Django is a high-level Python Web framework that encourages rapid development and clean, pragmatic design. Built by experienced developers, it takes care of much of the hassle of Web development, so you can focus on writing your app without needing to reinvent the wheel. – Django website
Let’s get started by creating a virtual environment:
mkproject iamThis will create, activate and change directory to the new Python virtual environment.
Install Django:
pip install DjangoCreate a Django project:
django-admin startproject iamThis will create a mysite directory in your current directory. With the following estructure:
.
└── iam
    ├── iam
    │   ├── asgi.py
    │   ├── __init__.py
    │   ├── settings.py
    │   ├── urls.py
    │   └── wsgi.py
    └── manage.py
Create a Django application:
cd iam/
python manage.py startapp users
That’ll create a directory users, which is laid out like this:
.
├── iam
│   ├── asgi.py
│   ├── __init__.py
│   ├── settings.py
│   ├── urls.py
│   └── wsgi.py
├── manage.py
└── users
    ├── admin.py
    ├── apps.py
    ├── __init__.py
    ├── migrations
    │   └── __init__.py
    ├── models.py
    ├── tests.py
    └── views.py
If you’re starting a new project, it’s highly recommended to set up a custom user model, even if the default User model is sufficient for you. This model behaves identically to the default user model, but you’ll be able to customize it in the future if the need arises. – Django documentation
Edit users/models.py adding the code bellow:
from django.contrib.auth.models import AbstractUser

class User(AbstractUser):
    pass
Change iam/settings.py to add users application to INSTALLED_APPS:
INSTALLED_APPS = [
    'django.contrib.admin',
    'django.contrib.auth',
    'django.contrib.contenttypes',
    'django.contrib.sessions',
    'django.contrib.messages',
    'django.contrib.staticfiles',
    'users',
]
Configure users.User to be the model used for the auth application adding AUTH_USER_MODEL to iam/settings.py:
AUTH_USER_MODEL='users.User'Create inital migration for users application User model:
python manage.py makemigrationsThe command above will create the migration:
Migrations for 'users':
  users/migrations/0001_initial.py
    - Create model User
Finally execute the migration:
python manage.py migrateThe migrate output:
Operations to perform:
  Apply all migrations: admin, auth, contenttypes, sessions, users
Running migrations:
  Applying contenttypes.0001_initial... OK
  Applying contenttypes.0002_remove_content_type_name... OK
  Applying auth.0001_initial... OK
  Applying auth.0002_alter_permission_name_max_length... OK
  Applying auth.0003_alter_user_email_max_length... OK
  Applying auth.0004_alter_user_username_opts... OK
  Applying auth.0005_alter_user_last_login_null... OK
  Applying auth.0006_require_contenttypes_0002... OK
  Applying auth.0007_alter_validators_add_error_messages... OK
  Applying auth.0008_alter_user_username_max_length... OK
  Applying auth.0009_alter_user_last_name_max_length... OK
  Applying auth.0010_alter_group_name_max_length... OK
  Applying auth.0011_update_proxy_permissions... OK
  Applying users.0001_initial... OK
  Applying admin.0001_initial... OK
  Applying admin.0002_logentry_remove_auto_add... OK
  Applying admin.0003_logentry_add_action_flag_choices... OK
  Applying sessions.0001_initial... OK
Django OAuth Toolkit
Django OAuth Toolkit can help you providing out of the box all the endpoints, data and logic needed to add OAuth2 capabilities to your Django projects. – Django OAuth Toolkit Documentation
Install Django OAuth Toolkit:
pip install django-oauth-toolkitAdd oauth2_provider to INSTALLED_APPS in iam/settings.py:
INSTALLED_APPS = [
    'django.contrib.admin',
    'django.contrib.auth',
    'django.contrib.contenttypes',
    'django.contrib.sessions',
    'django.contrib.messages',
    'django.contrib.staticfiles',
    'users',
    'oauth2_provider',
]
Execute the migration:
python manage.py migrateThe migrate output:
Operations to perform:
  Apply all migrations: admin, auth, contenttypes, oauth2_provider, sessions, users
Running migrations:
  Applying oauth2_provider.0001_initial... OK
  Applying oauth2_provider.0002_auto_20190406_1805... OK
Include oauth2_provider.urls to iam/urls.py as follows:
from django.contrib import admin
from django.urls import include, path

urlpatterns = [
    path('admin/', admin.site.urls),
    path('o/', include('oauth2_provider.urls', namespace='oauth2_provider')),
]
This will make available endpoints to authorize, generate token and create OAuth applications.
Last change, add LOGIN_URL to iam/settings.py:
LOGIN_URL='/admin/login/'We will use Django Admin login to make our life easy.
Create a user:
python manage.py createsuperuser

Username: wiliam
Email address: me@wiliam.dev
Password:
Password (again):
Superuser created successfully.
OAuth2 Authorization Grants
An authorization grant is a credential representing the resource owner’s authorization (to access its protected resources) used by the client to obtain an access token. – RFC6749
The OAuth framework specifies several grant types for different use cases. – Grant types
We will start by given a try to the grant types listed below:
- Authorization code
- Client credential
This two grant types cover the most initially used uses cases.
Authorization Code
The Authorization Code flow is best used in web and mobile apps. This is the flow used for third party integration, the user authorize your partner to access its products in your APIs.
Start the development server:
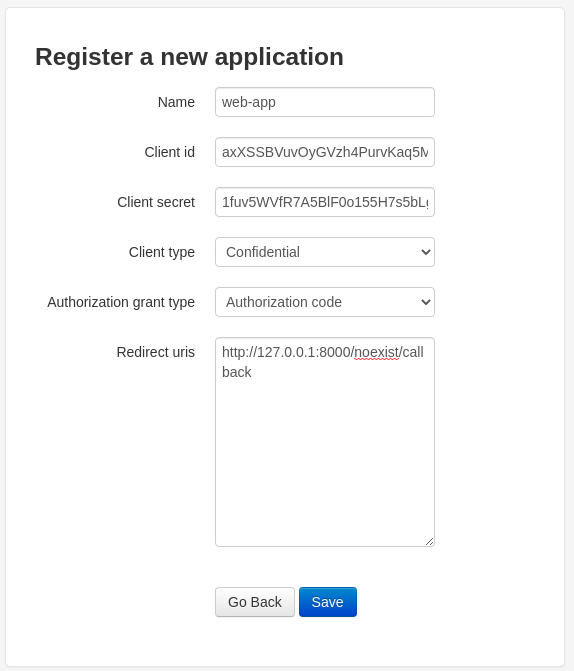
python manage.py runserverPoint your browser to http://127.0.0.1:8000/o/applications/register/ lets create an application.
Fill the form as show in the screenshot bellow and before save take note of Client id and Client secret we will use it in a minute.

Export Client id and Client secret as environment variable:
export ID=vW1RcAl7Mb0d5gyHNQIAcH110lWoOW2BmWJIero8
export SECRET=DZFpuNjRdt5xUEzxXovAp40bU3lQvoMvF3awEStn61RXWE0Ses4RgzHWKJKTvUCHfRkhcBi3ebsEfSjfEO96vo2Sh6pZlxJ6f7KcUbhvqMMPoVxRwv4vfdWEoWMGPeIO
To start the Authorization code flow got to this URL with is the same as show bellow:
http://127.0.0.1:8000/o/authorize/?response_type=code&client_id=vW1RcAl7Mb0d5gyHNQIAcH110lWoOW2BmWJIero8&redirect_uri=http://127.0.0.1:8000/noexist/callbackNote the parameters we pass:
response_type:codeclient_id:vW1RcAl7Mb0d5gyHNQIAcH110lWoOW2BmWJIero8redirect_uri:http://127.0.0.1:8000/noexist/callback
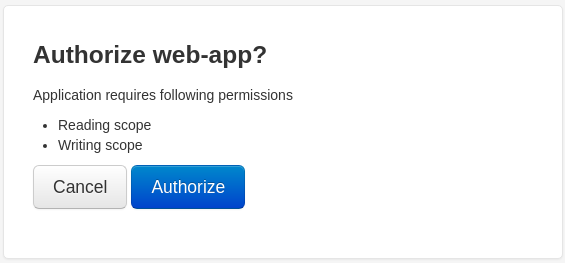
This identifies your application, the user is asked to authorize your application to access its resources.
Go ahead and authorize the web-app

Remenber we used http://127.0.0.1:8000/noexist/callback as redirect_uri you will get a Page not found (404) but it worked if you get a url like:
http://127.0.0.1:8000/noexist/callback?code=uVqLxiHDKIirldDZQfSnDsmYW1Abj2This is the OAuth2 provider trying to give you a code in this case uVqLxiHDKIirldDZQfSnDsmYW1Abj2.
Export it as environment variable:
export CODE=uVqLxiHDKIirldDZQfSnDsmYW1Abj2Now that you have the user authorization is time to get an access token.
curl -X POST -H "Cache-Control: no-cache" -H "Content-Type: application/x-www-form-urlencoded" "http://127.0.0.1:8000/o/token/" -d "client_id=${ID}" -d "client_secret=${SECRET}" -d "code=${CODE}" -d "redirect_uri=http://127.0.0.1:8000/noexist/callback" -d "grant_type=authorization_code"To be more easy to visualize:
curl -X POST \
    -H "Cache-Control: no-cache" \
    -H "Content-Type: application/x-www-form-urlencoded" \
    "http://127.0.0.1:8000/o/token/" \
    -d "client_id=${ID}" \
    -d "client_secret=${SECRET}" \
    -d "code=${CODE}" \
    -d "redirect_uri=http://127.0.0.1:8000/noexist/callback" \
    -d "grant_type=authorization_code"
The OAuth2 provider will return the follow response:
{
  "access_token": "jooqrnOrNa0BrNWlg68u9sl6SkdFZg",
  "expires_in": 36000,
  "token_type": "Bearer",
  "scope": "read write",
  "refresh_token": "HNvDQjjsnvDySaK0miwG4lttJEl9yD"
}
To access the user resources we just use the access_token:
curl \
    -H "Authorization: Bearer jooqrnOrNa0BrNWlg68u9sl6SkdFZg" \
    -X GET http://localhost:8000/resource
Client Credential
The Client Credential grant is suitable for machine-to-machine authentication. You authorize your own service or worker to change a bank account transaction status to accepted.
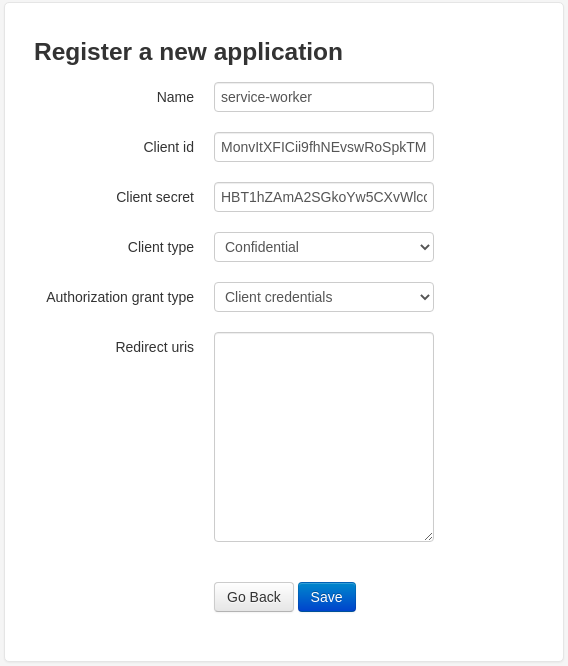
Point your browser to http://127.0.0.1:8000/o/applications/register/ lets create an application.
Fill the form as show in the screenshot bellow and before save take note of Client id and Client secret we will use it in a minute.

Export Client id and Client secret as environment variable:
export ID=axXSSBVuvOyGVzh4PurvKaq5MHXMm7FtrHgDMi4u
export SECRET=1fuv5WVfR7A5BlF0o155H7s5bLgXlwWLhi3Y7pdJ9aJuCdl0XV5Cxgd0tri7nSzC80qyrovh8qFXFHgFAAc0ldPNn5ZYLanxSm1SI1rxlRrWUP591wpHDGa3pSpB6dCZ
The Client Credential flow is simpler than the Authorization Code flow.
We need to encode client_id and client_secret as HTTP base authentication encoded in base64 I use the following code to do that.
>>> import base64
>>> client_id = "axXSSBVuvOyGVzh4PurvKaq5MHXMm7FtrHgDMi4u"
>>> secret = "1fuv5WVfR7A5BlF0o155H7s5bLgXlwWLhi3Y7pdJ9aJuCdl0XV5Cxgd0tri7nSzC80qyrovh8qFXFHgFAAc0ldPNn5ZYLanxSm1SI1rxlRrWUP591wpHDGa3pSpB6dCZ"
>>> credential = "{0}:{1}".format(client_id, secret)
>>> base64.b64encode(credential.encode("utf-8"))
b'YXhYU1NCVnV2T3lHVnpoNFB1cnZLYXE1TUhYTW03RnRySGdETWk0dToxZnV2NVdWZlI3QTVCbEYwbzE1NUg3czViTGdYbHdXTGhpM1k3cGRKOWFKdUNkbDBYVjVDeGdkMHRyaTduU3pDODBxeXJvdmg4cUZYRkhnRkFBYzBsZFBObjVaWUxhbnhTbTFTSTFyeGxScldVUDU5MXdwSERHYTNwU3BCNmRDWg=='
>>>
Export the credential as environment variable:
export CREDENTIAL=YXhYU1NCVnV2T3lHVnpoNFB1cnZLYXE1TUhYTW03RnRySGdETWk0dToxZnV2NVdWZlI3QTVCbEYwbzE1NUg3czViTGdYbHdXTGhpM1k3cGRKOWFKdUNkbDBYVjVDeGdkMHRyaTduU3pDODBxeXJvdmg4cUZYRkhnRkFBYzBsZFBObjVaWUxhbnhTbTFTSTFyeGxScldVUDU5MXdwSERHYTNwU3BCNmRDWg==To start the Client Credential flow you call /token/ endpoint direct:
curl -X POST -H "Authorization: Basic ${CREDENTIAL}" -H "Cache-Control: no-cache" -H "Content-Type: application/x-www-form-urlencoded" "http://127.0.0.1:8000/o/token/" -d "grant_type=client_credentials"To be more easy to visualize:
curl -X POST \
    -H "Authorization: Basic ${CREDENTIAL}" \
    -H "Cache-Control: no-cache" \
    -H "Content-Type: application/x-www-form-urlencoded" \
    "http://127.0.0.1:8000/o/token/" \
    -d "grant_type=client_credentials"
The OAuth2 provider will return the follow response:
{
    "access_token": "PaZDOD5UwzbGOFsQr34LQ7JUYOj3yK",
    "expires_in": 36000,
    "token_type": "Bearer",
    "scope": "read write"
}
The end.
At next part we will build a simple API to protect with OAuth2.